Post by TrapWorks on Jan 18, 2009 10:17:44 GMT -5
I don’t know if these modifications have ever been posted before but here goes.
These mods were posted on a British forum previously by a well known trapper and snare man called Glenn Waters.
Originally modified to kill Grey Squirrels they can be used for many other species and the modifications are very simple to do, I have made a couple of changes to the design also.
Modifications.
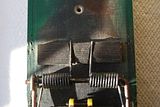
Addition of a ‘chin’ bar
Shimming the springs
Changed the length of the trigger wire
Adding a mesh tunnel or guide
Housing
Take a new Pro Victor Rat trap and remove the staple holding down the trigger wire, do not discard this as you will need it.
First we need a short length of high tensile steel bar or wire, this is to be bent into a 'U' shape but with tight right angled corners. The main length of wire is 6cm and the short legs are 2cm.
When the trap is at rest hold your wire against the killing bar and determine where to make the bends, the measurements are taken from inside the killing bar.
Drill holes in the wooden base to take the ‘legs’ of the wire, the holes should be no deeper than half way as there will be a lot of strain on the wooden base when the trap fires.
Use wood glue or epoxy resin to hold the wire in place.
Next we need to shim the springs. This is simply a matter of slipping a thin wedge of plywood or similar material under the springs ends. The spring ends naturally want to come together, this is prevented by using the staple we removed earlier to hold the ply wood in position with the spring ends held apart, one either side of the staple.
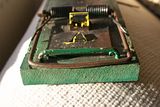
Of course if the trap is used ‘as is’ there is no guarantee that the animal will be over the chin bar when it fires so we need to guide the animal in, this is done with fine wire mesh, the kind used to make bird feeders is ideal. We need sufficient to make a two inch half circle with a little extra on the sides.
This section is placed over the plate, inside the killing bar and the extra side mesh is held under the killing bar with tacks or small staples.
Once the trap is housed in a suitable container this mesh will ensure that the animal, whether rat, squirrel, weasel or stoat will alway enter head first, ensuring either a strike to the back of the head or neck. More later.
Now for the trigger wire.
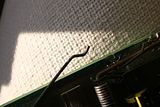
Most Victors come from the factory with triggers so short that the plate is held up at an alarming angle, this is rectified by straightening the bend in the trigger wire fractionaly. Now you should find that the treadle plate sits much lower to the base of the trap and is in fact hidden behind the chin bar when viewed from the front.
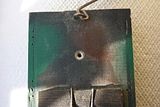
Drill a hole in the base of the trap above the springs and below where the trigger wire is connected. This allows the traps to be screwed to trees or walls, sheds, poles, fence posts etc.
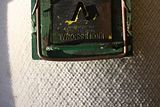
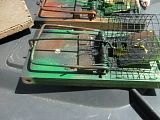
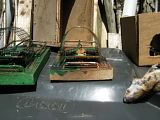
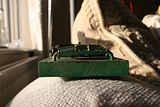
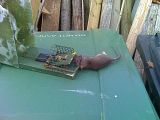
Here are some of the housings I use for my traps.
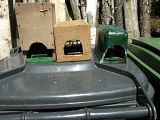
The one on the right is made from the bottom of a six pint milk carton, tacked on at the back of the trap it becomes hinged, allowing access to the trap when nailed or screwed up, it also provides a water proof housing.
Now, how it works.
The target animal (let's say a squirrel on a tree) can only enter from one direction, it puts its head inside the trap to get to the bait. When the trap fires the animal is struck by the killing bar at the base of the skull or on the neck, the chin bar forces the head back and breaks the neck (yes even on large squirrels).
The housing and the mesh tunnel always ensures the same strike everytime.
Baits range from peanut butter to meat.
Here are some unfortunates. You can see from the damage caused just how powerful these traps can be. In fact when you shim the springs it is possible to get a draw weight of 15-20lb.
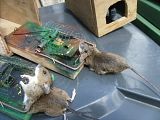
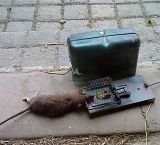
Remember never to fire one of these traps with a stick, you will bend the killing bar. use a soft material such as rubber hose or a rat...
All the best to all and good hunting.
T
These mods were posted on a British forum previously by a well known trapper and snare man called Glenn Waters.
Originally modified to kill Grey Squirrels they can be used for many other species and the modifications are very simple to do, I have made a couple of changes to the design also.
Modifications.
Addition of a ‘chin’ bar
Shimming the springs
Changed the length of the trigger wire
Adding a mesh tunnel or guide
Housing
Take a new Pro Victor Rat trap and remove the staple holding down the trigger wire, do not discard this as you will need it.
First we need a short length of high tensile steel bar or wire, this is to be bent into a 'U' shape but with tight right angled corners. The main length of wire is 6cm and the short legs are 2cm.
When the trap is at rest hold your wire against the killing bar and determine where to make the bends, the measurements are taken from inside the killing bar.
Drill holes in the wooden base to take the ‘legs’ of the wire, the holes should be no deeper than half way as there will be a lot of strain on the wooden base when the trap fires.


Use wood glue or epoxy resin to hold the wire in place.
Next we need to shim the springs. This is simply a matter of slipping a thin wedge of plywood or similar material under the springs ends. The spring ends naturally want to come together, this is prevented by using the staple we removed earlier to hold the ply wood in position with the spring ends held apart, one either side of the staple.

Of course if the trap is used ‘as is’ there is no guarantee that the animal will be over the chin bar when it fires so we need to guide the animal in, this is done with fine wire mesh, the kind used to make bird feeders is ideal. We need sufficient to make a two inch half circle with a little extra on the sides.
This section is placed over the plate, inside the killing bar and the extra side mesh is held under the killing bar with tacks or small staples.


Once the trap is housed in a suitable container this mesh will ensure that the animal, whether rat, squirrel, weasel or stoat will alway enter head first, ensuring either a strike to the back of the head or neck. More later.
Now for the trigger wire.

Most Victors come from the factory with triggers so short that the plate is held up at an alarming angle, this is rectified by straightening the bend in the trigger wire fractionaly. Now you should find that the treadle plate sits much lower to the base of the trap and is in fact hidden behind the chin bar when viewed from the front.

Drill a hole in the base of the trap above the springs and below where the trigger wire is connected. This allows the traps to be screwed to trees or walls, sheds, poles, fence posts etc.

Here are some of the housings I use for my traps.

The one on the right is made from the bottom of a six pint milk carton, tacked on at the back of the trap it becomes hinged, allowing access to the trap when nailed or screwed up, it also provides a water proof housing.
Now, how it works.
The target animal (let's say a squirrel on a tree) can only enter from one direction, it puts its head inside the trap to get to the bait. When the trap fires the animal is struck by the killing bar at the base of the skull or on the neck, the chin bar forces the head back and breaks the neck (yes even on large squirrels).
The housing and the mesh tunnel always ensures the same strike everytime.
Baits range from peanut butter to meat.
Here are some unfortunates. You can see from the damage caused just how powerful these traps can be. In fact when you shim the springs it is possible to get a draw weight of 15-20lb.


Remember never to fire one of these traps with a stick, you will bend the killing bar. use a soft material such as rubber hose or a rat...
All the best to all and good hunting.
T